This post is in response to the comments and requests I receive regularly. How do you make a video every week? You are busy! Here’s the Proven 15-step Checklist I use to make content marketing videos for my brand, Learning Carton.
“Practice isn’t the thing you do once you’re good. It’s the thing you do that makes you good.”
-Malcolm Gladwell.
I’m on a mission to help people make and use video for learning purposes. In addition to helping companies make training and learning experiences, I’m also driven to help you learn how to make a certain type of video, “learning” video as I call it. Video that teaches people the KSB, Knowledge-Skills-Behaviors, to help them learn.
So let’s get to it!
My Content Marketing Video Process
When I first started making videos professionally, I was horrified that I would look like an idiot with tools I had no idea how to use. I didn’t know the focus from an f-stop. I failed a lot. Fortunately, I had a mentor, Damien, who was patient, kind, and fun. That last trait, my favorite f-word (FUN!) is why I still make videos professionally today. Once I had my motivation set, it was time to do what I do when I am learning anything.
Define the process
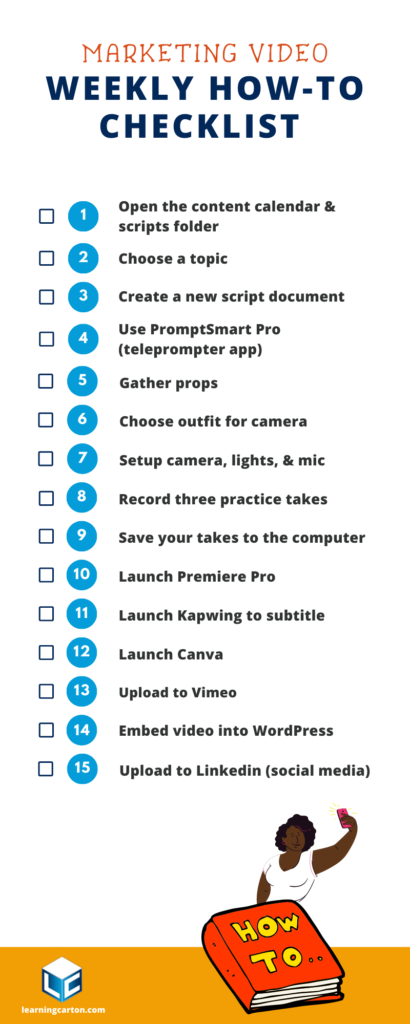
It turns out, making videos requires a bunch of processes. I’ve assembled those into an annotated read-do checklist guide called, “The Proven 15-step Checklist To Easily Make Weekly Videos”. The key for me and for you is to create your own process, document it, and do it over and over again until it is a comfortable routine. Here is the process checklist I use.
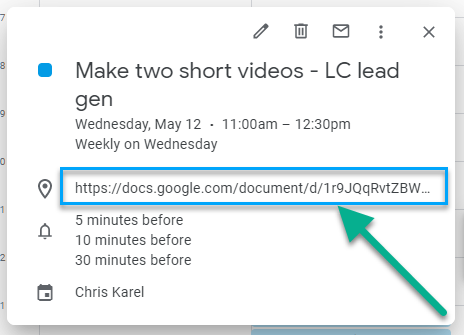
Pro-Tip: Create a recurring calendar appointment with a hyperlink to your checklist so that you don’t have to hunt for the checklist when you start making a video.

The Annotated Proven 15-step Checklist
1. Open these items:
- Content calendar
- Scripts folder (in Google Drive)
[Producer notes: I start every project by opening my content calendar and my scripts folder, which are hyperlinked to their locations in a recurring Google calendar appointment. The content calendar is a complex spreadsheet that lists all types of content I make for my business, focusing on blogs and videos. The scripts folder is self-explanatory – it’s where I keep my templates for new scripts and my existing scripts.]
2. Choose a topic in the content calendar or select a topic from the blog ideas section of the calendar.
[Producer notes: I regularly do several exercises to generate an ever-growing list of topics that could make a good video. I list the topic by catchy title. For example, “How to Make Content Marketing Videos Every Week.”]
3. Create a google doc inside of the Scripts folder.
- Name it appropriately using a sequential three-digit number corresponding to the numbering in your content calendar.
- Use Headline Analyzer to score 80 or above (optional)
- Draft an outline of the post using a chosen template
- Write the script and speak it out loud
[Producer notes: Step 3 starts with a document that is saved in the scripts folder. I name them using a convention that stays the same with every file. Then I link over to Headline Analyzer to try and get the title to score over 80 for SEO purposes. Then, I draft the post and practice it out loud several times until it feels natural. Since I’m the “talent” in my videos, I write for my voice.]
4. Use PromptSmart Pro.
- Upload the script into PromptSmart pro in your iPhone or iPad
- Format the spacing by test reading
[Producer notes: I’ve settled on the paid version of PromptSmart Pro to teleprompt all of my videos. It has a pretty solid live voice track feature, meaning as I speak the words scroll up. Since I make my videos on my own, I need this tech.]
5. Gather props.
[Producer notes: Now it starts to get exciting. I look around my home and maybe even my friends’ homes for things I can incorporate into my video. I assemble them into one place so that I can have them at hand when I start to record.]
6. Choose your outfit aka “wardrobe.”
[Producer notes: Choosing the right things to wear on camera should be about the story first and then professional best practices second. Here’s a link to a post about What to Wear on Camera or watch my video What Should I Wear on Camera?]
7. Set up your camera, lights, and microphone.
[Producer notes: I use a “CLASSY” video process to make my videos more professional, and you can, too. Here’s a link to a post: Step 4: Make the Video, which contains detailed instructions on how to set up, light, and record audio.]
8. Do three practice runs and delete them if they are bad.
[Producer notes: Once I’m set up and I start recording, I need to direct myself. Haha! I record myself using the PromptSmart Pro app and then watch it back. I adjust the script to shorten or make it more conversational by adding transitions and removing repetitive words. Then, I record it again and watch it back. This time I pay attention to framing and my eyes. I record it again and, usually by the third take, I’ve got a clip that is done but not perfect. You are chasing progress over perfection when it comes to content marketing.]
9. Connect your phone/iPad to your computer.
-
- Save the file into the Source Files folder
- Rename the source files to match the file names
[Producer notes: Once you have your best take – or takes – recorded (I used my iPhone), then you immediately need to offload it to your computer. I attach my phone to my PC and save the file into what I call the Source Files folder. This hyperlinked folder is where I save all of my raw unedited video clips as they come out of the camera. If I have time, I rename the source files so that they match the script].
10. Launch Adobe Premiere Pro.
- Open the project file (the one you edit in every week)
- Edit the video
- Duplicate the previous video’s sequence
- Rename it to the new file name in the content calendar with the number
- Import source file
- Cut the in and out
- Adjust the audio
- Add graphics, image, audio effects
- Color correct
- Export
[Producer notes: If you don’t use Premiere Pro, I suggest reading this step with a process mindset instead of a “Read, Do” checklist mindset. In other words, adapt the steps above to your own Proven 15-step Checklist ]
11. Launch Kapwing to subtitle the video.
- Select New Content
- Drag new video onto the workspace
- Select the Subtitles button & edit ins and outs, grammar, and spelling
- Export to the Exports Folder in Short Social Videos
[Producer notes: People are more likely to watch an entire video if there are captions available. With the availability of in-program tools and free tools like Kapwing, adding captions has never been easier.]
12. Launch Canva.
- Create a thumbnail image that represents the video
- Export thumbnail to Thumbnails for Vids
- Upload to Media Library on WordPress
[Producer notes: I was trained to use the Adobe Creative Cloud. I still use Adobe apps to edit videos and will occasionally use Photoshop and Illustrator. However, Canva has dried up my need for those tools. Canva’s templates and ease of use surpasses the start from scratch nature of Adobe’s apps.]
13. Upload to Vimeo.
- Set the title
- Upload the thumbnail from the thumbnails folder
- Change privacy settings
- Paste the updated script into the description
[Producer notes: If you don’t know about Vimeo, then start learning now. It’s better than YouTube when it comes to review tools (which come at a premium membership) and ads are almost non-existent. I use vimeo to host my videos for my website and I use Vimeo to develop content with my clients.]
14. Embed the video into the WordPress blog post editor.
-
- Right sidebar:
- Publish: Set publish date and select schedule
- Format: Most will be standard
- Categories: Choose one or two
- Tags: Apply most used and use a keyword too
- Set featured image (thumbnail)
- Body:
- Paste content from the doc, select and clear formatting
- Insert read more after opening lead-in
- Remove extra spaces
- Make sure h2 and h3 are appropriate
- Format: bold, list, bullet, dividing lines, etc.
- Select each link and make sure it’s set to open in a new tab
- Yoast SEO
- Enter keyphrase
- Edit meta description, include the keyword in the description
- Resolve SEO Analysis issues to get to green
- Right sidebar:
[Producer notes: I use WordPress for my website. The sub-step checklist above is how I maintain consistency and handle batch uploading content specifically for WordPress. The key is setting the publish date, which I track in my content calendar.]
15. Upload to Linkedin – Every Thursday!
[Producer notes: My final step is to post my video to LinkedIn. I post the actual video file to my feed on LinkedIn. I don’t place a link to my WordPress site because I’ve heard it will help my post be seen by more people if I directly post the video file on LinkedIn. Posting in all of your channels is the best practice for sure!]
Conclusion
Making content marketing videos requires consistency. The best way to maintain consistency is to use repeatable checklists. I use this Short Social Video Checklist every single week. By placing it as a link in a calendar appointment, I can quickly launch into the process and start creating. I don’t have to remember every step or every detail, because my checklist is built around a “Read, Do” approach supported by the Checklist Manifesto’s way of writing checklists. Now it’s your turn. Take this checklist and make it your own. Create hyperlinks to your own documents and start making better, more consistent content that leads people to take action.
Join my learning pals
Did this post, The Proven 15-step Checklist To Easily Make Weekly Videos give you the guidance you needed to make more videos every week? What part do you want to know more about? Let me know in the comments.
Did you like what you read? Join my learning pals. Please subscribe to my newsletter to receive free learning resources delivered to your inbox every two weeks.
THE END


