I’m on a mission to help people make and use video for learning purposes. How do you set up to record learning videos? Follow my six-step process and you’ll record like a professional. Like the other skills I teach to people, this one requires practice. As you jump in and start working through the six steps, be kind to yourself. Nurture your inner artist. Find what you’ve done well and build on it as you correct the things that didn’t go well! Indulge me if you will, and let’s look quickly at the theory behind my process. But first, a quick interlude to share a soothing piece from my nurtured inner artist.
She rests her adorable little head on the back of the sofa so she can comfortably stare at my every move.
Poised to follow, play, or protect – the pup is ever-ready!
She inhales, sighs it out, and melts into the pose.
Her Gaze ~ Chris Karel
The Theory Behind This Karelian Process
When I taught life skills to high school students, I didn’t realize the importance of my own curriculum. As I’ve worked with adult learners over the last ten years or so, I’ve realized that everyone can benefit from what I was teaching in high school. I know I certainly did. One of the core components was the Seven Habits of Highly Effective People by Stephen R. Covey.
This “How to Set Up” procedure embodies Covey’s first three habits, which are collectively known as the “Manage Yourself” habits. For example, learning and using my six-step process to set up and record video is pro-active (Habit 1). By planning ahead and relying upon your instructional design and pre-production processes, you are beginning with the end in mind (Habit 2). And finally, the six-step process will enable you to put first things first (Habit 3). I strive to be highly effective and my processes are designed to help you be highly effective, too. Let’s get to step 1 where you will frame your first background.
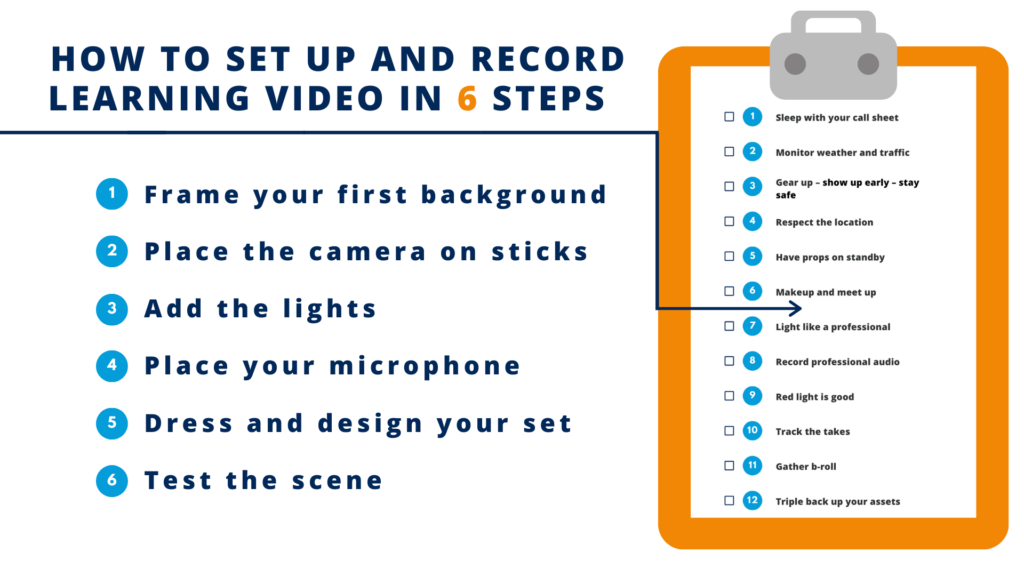
How to Set Up and Record Learning Videos in 6 Steps
This process is designed to help you make a LEARNING video. Learning video is designed to improve knowledge, skills, and behaviors. There are numerous steps and processes that come before this 6-step process, which takes place after you arrive at your location. If you read How to Record Professional Learning Videos : The Ultimate Checklist, this post fits in between steps 6 and 7 of the production checklist.
Before you arrive at your location and meet up with everyone, you should have completed the following:
(Please follow the links to our posts on these topics to learn more).
- Needs analysis to identify skill gaps, objectives, evaluation, budget
- Instructional design & scriptwriting
- Pre-production checklist (12 items)
- Production checklist (12 items)
Now, you are ready to set up! The six-step process to record learning videos begins with framing your first background.
Step 1:
Frame your first background
Use “director hands” or “finger frames” to find your first camera position. The ideal camera position for a scene is often called the “golden spot,” like “X” marks the spot where the gold is located! It may sound silly, but it’s a tried and true technique that works! When you scouted the location you were hopefully able to find your first background. Now, it’s time to find the perfect spot for your scene by using your hands to find the right lens and camera position for your first set up. If you are using a mobile phone or a camera with a single lens, the action is the same.

Now that you have effectively used “finger frames” to identify your first background, don’t move.
Use a piece of gaff tape, or any easy-to-remove-tape, to mark the spot on the floor before you move to step 2.
Step 2:
Place the camera on sticks
I’ve seen some DP’s stand on the golden spot while the grip brings the sticks and the camera to her or him. Sticks is film slang for a tripod. This is ideal! Together, they mount the camera on the tripod, level it, and power it on. Once powered on, the DP looks through the lens at someone standing in for the talent. The DP and grip work together to adjust the camera position so that it creates a visually pleasing image composition. They also evaluate if there is enough room around the actor to capture the whole action that will be happening in the scene.
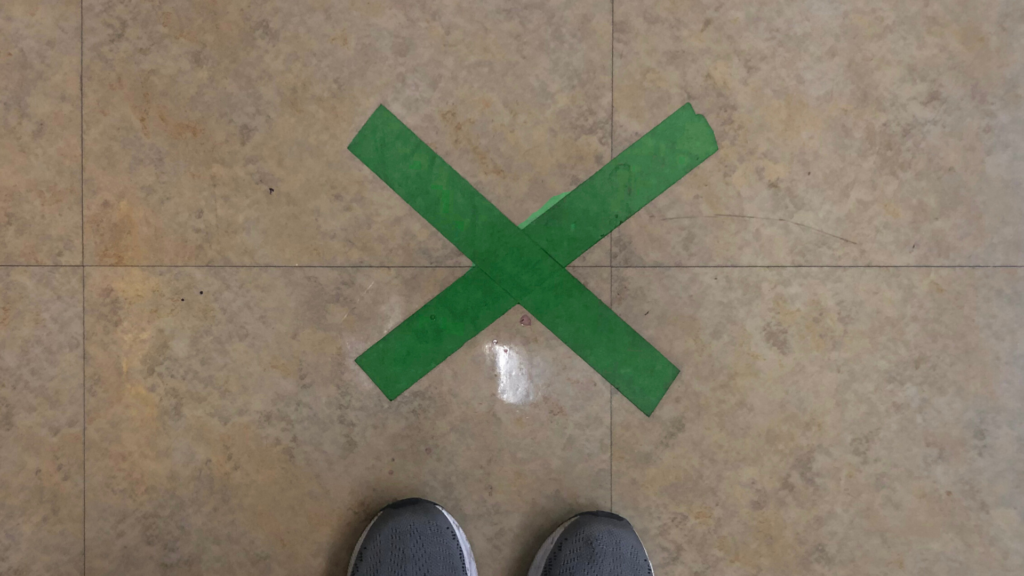
If you are on your own, you will smile and say to yourself, “Thank you, Chris Karel” when you realize that you were instructed to mark the floor with tape so you can easily find the golden spot.
When you make a video by yourself, use an object like a plant on a chair or a lamp on a stool to mark where the talent (you) should stand. Then, press record on the camera and walk into position in front of the chair/stool. Stand still for a moment, move your arms up and down, and gesture dramatically as if you are giving a speech.
Now walk back to your camera and stop the recording. Review the clip you just made. Just like the DP and grip, you should watch yourself to see if your arms get cut off when you gesture. Evaluate your headroom to make sure your eye line is on the upper third line. Repeat the process until you are happy with the composition.

Before you move onto step 3, use your tape to mark the spot where you plan to stand and deliver your lines. I use “T-marks” to mark the spot where the talent should stand. Place the “T” on the ground so that both feet will fit on either side of the T like the picture below.

Step 3:
Add the lights
Start by placing the key light (the brightest, most powerful light). With a stand-in on their mark, move the key light to the right or left until you’ve created a soft light with very little shadow on the subject’s face, and zero shadows on the surfaces behind the subject. Once the key light is in place add your fill light to round out the subject’s face. Finally, add the backlight – also known as hair light – to make the subject pop off the background.

Then, spike the position of the actor. It’s not as violent or volley-bally as it sounds. By this I mean use gaff tape to place a “T” on the ground where the actor should stand. The base of the “T” goes between the actor’s feet and the top of the “T” should be perpendicular to the lens of the camera.
If you are recording yourself, then you already marked your “T.” It’s really helpful to have a monitor or use your mobile phone in selfie-mode to adjust the lights around you. Place a light, and look at the image in selfie-mode then add your other lights. The process is the same: Key light, add the fill light to reduce the shadows and add the backlight to make your image pop off the background.
Next, it’s time to set up the most important part of the video! Audio!
Step 4:
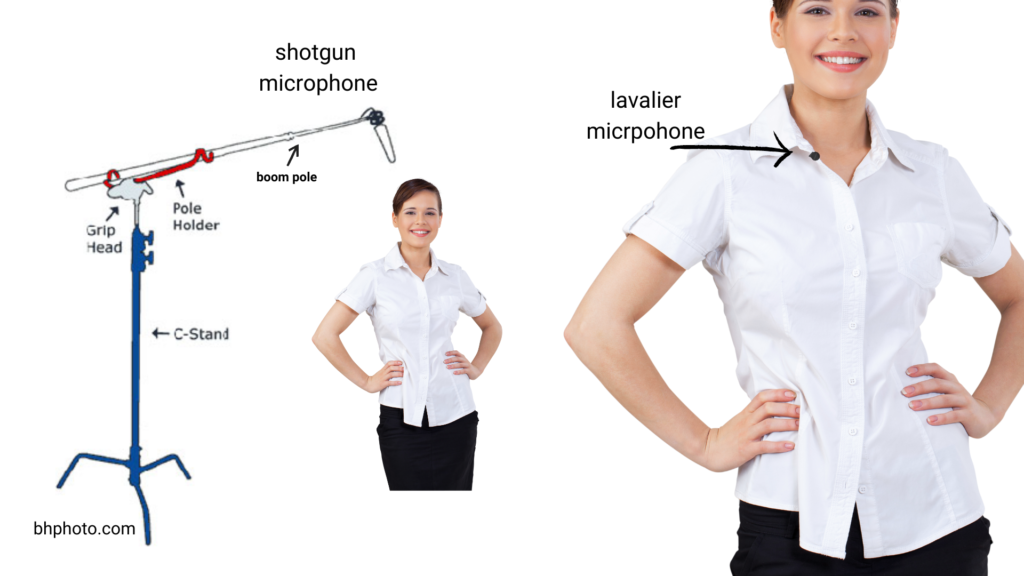
Place your microphone
I always try to use a shotgun microphone when I record learning videos. If that is not an option, use a lavalier microphone. I like to mount a shotgun microphone from a boom pole over the scene. If possible, use a grip head and a c-stand to mount the boom pole. Make sure it doesn’t dip into the frame!
Pro-tip: Professional audio is invisible. You should never see a microphone nor should you think, “something is wrong with the audio.”
Once the mic is roughed into place, you can connect it to the camera or field recorder depending on your audio setup. Press record and do a soundcheck. Have your talent talk normally as if they were performing the script. Monitor the audio with headphones and make sure the levels are appropriate!
If you are recording by yourself, set up your microphone of choice and press record. Perform the first sentence or two of your script. Then, take the time to play it back and listen to the quality. Use studio headphones or a pair of wired earbuds at a minimum. Avoid wireless or Bluetooth headphones as they can run interference during recording.
Listen for annoying hum sounds or outdoor noises. I suggest you try to guarantee that the audio quality is professional by monitoring the audio playback to ensure that it doesn’t clip. Clipping is when the audio wave extends past the allowable limit. Think grungy-heavy-metal guitar sound or someone placing their mouth on a microphone and yelling. The sound is distorted.
To capture pro-audio, try to keep your peaks (highest point of your audio wave) below -3. If the previous sentence made no sense to you because you are using a mobile phone or a camera that does not show you audio levels, then you need to rely on playback to ensure you record professional audio. Avoid clipping at all costs. You can turn up the audio, within reason, during post-production, but if your audio clips, there is no way to fix it effectively.
Up next, build your set.
Step 5:
Dress and design your set
Placing your props and moving background elements both in and out of a scene can elevate the look of your video if you follow a few simple rules.
- Avoid clutter unless the scene demands it
- Place green or blue items in the background to add color without distraction
- Keep warm-colored items (red, orange, yellow) to a minimum so they don’t compete with your subject
- Break the frame with your design

Breaking the frame can mean having a chair that is half in the scene and half out, which creates a realistic image. A plant that just edges into the frame also adds texture and creates realism. Amateur-looking scenes look fake because everything is perfectly placed, sterile, and fits like a puzzle in the frame of the camera. In the photo above, notice how the desk behind our subject breaks the frame.
Pro-tip: Place items in your scene during the set up of the camera, lights, and audio. Once the talent is in place, you can tweak everything to get it just right.
For continuity purposes, you might want to take a picture of the placement of items before recording a scene so you can put them back into place with each take. Continuity errors can distract the viewer from the intended message of the video. They’ll be too busy wondering where that big vase of flowers went and not learning about the laws of thermodynamics.
One final step before you call action: test your scene.
Step 6:
Test the scene
Using a field monitor plugged into your camera, evaluate the scene. A field monitor is like a little television with the camera feed that helps you see your scene as it will be on video, instead of having to look through the camera’s lens or tiny LCD screen.

Have the talent on their mark (the “T” made of gaff tape on the floor). Make sure the talent’s hair and makeup look great under the light. Be on the lookout for hair that wants to stick out unnaturally or flies away from the head in bizarre directions when moving. If the talent’s skin has become shiny, use a little powder or an oil-absorbing sheet to remove the shine and get them appearing presentable again.
Check audio levels by having the talent speak naturally in the direction they will be talking for the scene. Remember, you want the audio levels to be between -12 and -9 and take care to keep your peak at -3. If you cannot measure the audio using a numbered scale, then do a second sound check as you did in step 4.
Finally, make sure the power levels in all devices are at full strength. If using batteries, they should be mostly full, along with a completely charged or new backup nearby for a quick swap out if needed. If you can plug devices directly into the wall, this is ideal.
Check your storage/memory cards to make sure they are formatted and have enough space on them for the footage you are about to record.
You are ready!
Ok, time for a quick break. I always try to have the crew and talent use the facilities and refresh their water or beverage of choice before we record. Always ask the talent to cover their clothes with a smock or towel to avoid creating any water splashes or food stains.
Summary
Now that you know how to set up and record learning videos, it’s time to practice. Use those “finger frames” and find your background. Have fun with it. You are the director now! Find your golden spot and mark it with an “X” for your camera position. Use your tape to also place a “T-mark” for the talent. Practice making this happen. Adding lights and setting up the microphone will take loads of practice. It’s okay. Be kind to yourself, channel your inner artist by writing an ode to a dog (or lizard or chinchilla – any creature you love), or whatever brings you peace. Finally, test your scene. After all, you’ve spent all the time and patience getting everything perfectly in place. So remember to test it out before you start recording the script for real!
Helpful Links
Are you new to learning about video for learning? Consider reviewing my four-part series, Video for Learning Fundamentals.
Part 1: The Case for Video
Part 2: We Need Learning Video Production Skills
Part 3: 5 Phases of Video Production for Learning
Part 4: The Glossary of Learning Video Terms
Join my learning pals
What else should be in this how-to guide? Share your voice with me.
Did you like what you read? Join my learning pals. Please subscribe to my newsletter to receive free learning resources delivered to your inbox every two weeks.
THE END