I’m on a mission to help you make better videos for learning purposes. To light a learning video like a professional you need to master three lighting concepts: Three-Point Lighting, Texture, and Color Temperature. Dive in and look at the action steps you need to take to make this happen. As you master the process, your skills will transform your videos into “lit” learning objects!
“Cinematic lighting is a film lighting technique that goes beyond the standard three-point lighting setup to add drama, depth, and atmosphere to the story”. (Masterclass).
In learning video, we should learn from the cinematic professionals and be inspired by them, but we have a different goal! We are trying to improve the KSB (Knowledge, Skills, & Behaviors) of our learning audience! So, we mustn’t overproduce our lighting or scene setups to the point where we lose sight of the KSB.
— Chris Karel
How to light a learning video like a professional!
There are three lighting concepts you need to understand if you are going to light a learning video like a professional: Three-Point Lighting, Texture, and Color Temperature. Similar to audio, bad lighting in a learning video can be distracting to the audience and take away their focus from the KSB.
Good lighting also contributes to the credibility factor of the video. Imagine you are an employee watching a training recorded in a dimly lit conference room, with only a couple of fluorescent overhead ceiling lights above the actor. You might think, “Wow, what a janky video – clearly they’re not taking this training all that seriously, so why should I?”
Your understanding of the process of “lighting” a scene will determine what kind of lights you need for any given video. If you need to determine what lights you should use, check out The lighting gear you need to make learning videos.
Good lighting is a skill that requires practice and should not be taken “lightly” (pun intended). If you are not using a production crew, here are a few things to keep in mind to make sure you record learning videos that look professional:
Pro-tips for professional lighting:
- The overall look matches the subject matter
- Shadows have soft edges (soft light is the best light for learning video)
- There are no hot spots, bright spots, or glare
- Use backlight to separate the subject from the background
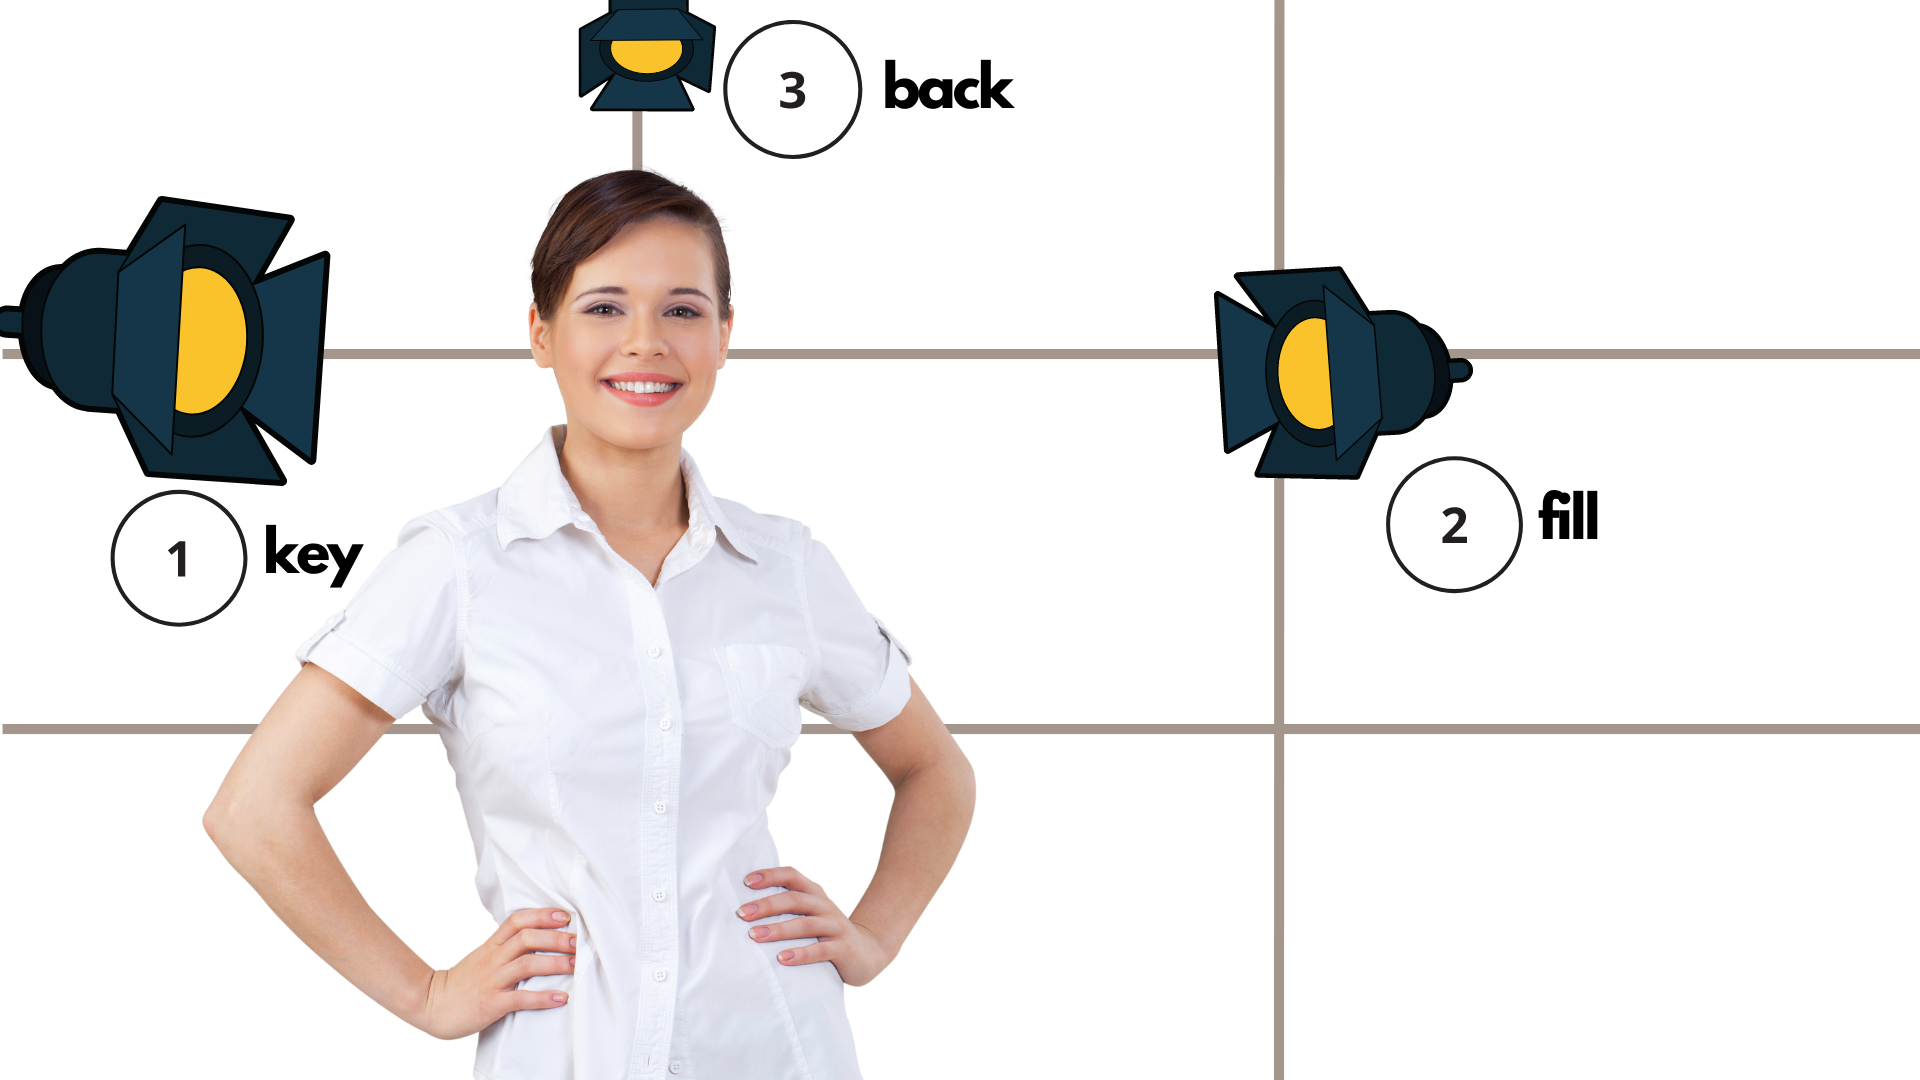
First, let’s look at the basics of setting up three-point lighting.
Setup 3-Point Lighting in 10 minutes
Start with the Key Light
Start by turning off overhead lights or any room lights – fluorescent lights are especially noisy on camera. They also make everything green and icky. Place the key light, which is the brightest light. Place the light on a 45-degree angle on the right or left side of the actor.

You can use the sunlight from a window. Be careful though! The sunlight will change over the course of the day, so if you are recording short-form videos you’ll be good to go. However, if your recording takes more than an hour or if the day is cloudy, your light “brightness” will change and affect the quality of the final edit.
Add the Fill Light
Use a second light, a little dimmer than the key, to fill in the shadows. Aptly named, the FILL light. You can also use a whiteboard or reflective surface to bounce the light from the key into the shadows. With both lights placed and on, evaluate how it looks on camera.
Use a Backlight to be a Pro
The final – and I believe most important – light to make your videos look professional is the back or hair light. The hair light helps your subject stand out from the background and adds a believable texture to the feel of the video. The combination of all of the above is called three-point lighting.
[insert image and explanation]
Always check to see how things look through the camera!
A Final Note on 3-point lighting
Get two or three lights and practice [How to Choose the Lights You Need]. Set up the lights and record yourself standing on your mark. Look at the lighting. Try to improve the shadows, use the backlight to pop yourself off the background, and then practice some more! You can do it! Snap an image and send it to me! I’ll give you free feedback! To light a learning video like a pro, you have to practice. Have fun practicing with your friends and family! Then, send me an image for review.
Looking for more video tutorials on 3-point lighting? Check out these awesome tutes!
How to Set up 3-Point Lighting for Film, Video, and Photography
Filmmaking 101 – Three Point Lighting Tutorial
How do you want the audience to feel? Different kinds of lights, with varying styles and intensity, can give audiences tonal cues. Think about how your lighting helps convey the mood that matches your message. (YouTube Creator Academy)
Trying to adjust the lighting in the video afterward is normal if you are an experienced editor. But, despite the advances in video editing software, you will make your life easier by lighting the scene properly during recording. The process of “fixing” the lighting during editing is called color correction. Are you making learning videos yourself? Production will be easier and quicker if you can avoid this step.
Do you want to learn how to color correct? Here is a great tutorial by Justing Odisho – How to Color Correct in Adobe Premiere Pro CC (Basic Correction + Lumetri Scopes Tutorial)
If you are just getting started, here’s a video I made of the 4-step process you can use to light a learning video scene.
- Set the Key Light – sun or brightest
- Place the Fill Light – or bounce
- Use a Back or Hair Light
- Adjust the “T” on the floor
Now let’s nerd out over some lighting gear you need to make all six types of learning videos.
Texture
You create texture by separating your subject from the background. As I mentioned above, three-point lighting can make your subject pop. By illuminating the subject more than the background you can create depth or texture.
Carefully placing your lights or your subject in a way that creates soft shadows on the person’s face and one side of the body will also add texture to the subject. Look at these two images. Which one is more interesting to you? Hopefully, you were drawn into the image on the left. Notice how light (sun or key) is used to illuminate the subject from the left, making her brighter and more brilliant looking than the background. The background has been lit nicely, too, but it doesn’t overshadow the subject. An advanced camera technique called depth of field is used to blur the background.

In contrast, the image on the right is flatly lit, meaning light is on everything in equal amounts. This is like retail big box lighting. The light value is the same everywhere. It’s not poorly lit, and if a person was standing in that space, we could record them talking to the camera. However, it will not be as interesting to look at. The visual beauty is lacking compared to the image on the left. The background is dark and uninviting as well.
Texture in an image creates visual interest as well as a notion of space and dimension. Three-point lighting is a wonderful technique for accomplishing this and saves us from boring, flat images. Texture is about creating the illusion of depth in a two-dimensional image. Until Augmented and Virtual reality become as common as cell phones, you need to master texture when lighting your videos.
Color Temperature
(ADVANCED – skip this if you are just getting started)
Orange and Blue affect us! By understanding color temperature and the impact it has on us subconsciously, you can make conscious choices about the color of your learning videos.
Color temperature refers to white light in terms of how blue or orange it is. Basic color theory tells us that blue and orange are complementary colors, meaning when placed together the contrast is pleasing to the eye.
Orange is warm and inviting, like a sunny day or a candle glowing in the evening. Blue is cool and either calming or chilling, like a clear sky or a snowy evening landscape. Simply put, fire and ice equal orange and blue.
Orange and Blue: Why Is It So Popular In Movies and TV
So let’s apply a little color theory here. If you are making a learning video and you want things to feel bright, cheery, and upbeat, then the coloring of the image (light, wardrobe, props) should shade more toward the orange spectrum. In contrast, (pun intended) if you want to build tension or create uncertainty then shade your image toward blue. By blending the two, you can artistically communicate with your learner. For example, by illuminating your product images with a more orange light while setting it in a bluish background you will visually tell your learner that they should pay close attention to the product and not its surrounding background or objects!
Here’s a helpful video about product lighting:

Helpful Links
Color: Messages and Meanings by Leatrice Eiseman
I use this book weekly. Great reference images and quick chunks of info that help me make visual design decisions. Add it to your toolkit!
Using Natural Light for Video Production – Full of great tips from Phil Ebiner
How to set up lighting at home when you have no budget
How to Get the Perfect Lighting for Video
Summary
Mastering 3-point lighting is a top skill in making professional learning videos. The only way you can learn how to light videos is to buy some lights and start doing it every time you make a video. As you start to master 3-point lighting you’ll find your own creative ways to use texture. With practice, you’ll grow into using lighting and camera techniques like depth of field that will create even better texture in your two-dimensional images. Remember: depth, shadow, and color will add visual interest and credibility to your videos. Finally, learn about balancing the colors of orange and blue. Orange is fire, blue is ice! Creating a moving image that is pleasing to the eye for your learners requires a balance between the two.
Join my learning pals
How do you light your learning videos? Share your voice with me.
Did you like what you read? Join my learning pals. Please subscribe to my newsletter to receive free learning resources delivered to your inbox every two weeks.
THE END