When you are trying to master video editing. A checklist is a great tool! Checklists help better organize your assignments and to easily verify your most important tasks. They reduce errors and ensure consistency and completeness in carrying out a duty. As you learn how to edit learning video, this checklist is the perfect reference guide to help you export like a professional!
Video editing should be taught in school right along with typing, reading, writing, accounting mathematics, and critical thinking. Since you probably weren’t taught how to edit learning video in school, I’m jumping in to help you learn how to do it now and sweetening the deal by giving you this annotated checklist.
Checklists save you time because you don’t need to use time remembering the steps, therefore you can dedicate all your time on doing the task. Checklists also allow you to delegate tasks confidently and effectively. Using a checklist is an excellent way to make our lives simpler and our businesses more productive.
~ Sandra Melo How to use checklists to improve efficiency?
I’m on a mission to help you make video for learning purposes. In order to understand how to edit learning video you need similar skills and tools that marketers and filmmakers use, but there is a key difference: #KSB. When editing a learning video you must deliver on the promise of improving knowledge, skills, and behaviors always at the forefront of the process. This checklist guide will help you become a better professional video editor.
CAUTION: Wait, what? If you haven’t analyzed the need, written the script, planned out the production, set up and recorded all of your footage, then stop reading this checklist and refer to the helpful posts below:
A Training Needs Analysis Guide
Ultimate Guide to Scriptwriting
Video Pre-production for eLearning: The Ultimate Guide
How to Set Up and Record Learning Videos in 6 Steps
How to Record Professional Learning videos: The Ultimate Checklist
How to Edit Learning Video: The Ultimate Checklist

PLAN

Review the purpose
Before you start dealing with any video clips or footage, you need to remind yourself why you are making the video. Are you raising awareness? Teaching a skill? Demonstrating a process? Keep this in mind so that you can use the appropriate cues in the video to achieve the purpose of the video. For example, if you are trying to teach your learners 5 steps to follow when sending an email, then using text on the screen will be helpful. Creating a recap of the list of steps will also be essential. If you disregard the purpose, you run the risk of creating a sequence with flashy graphics that do not accomplish the purpose of the video.

Follow or create the review process
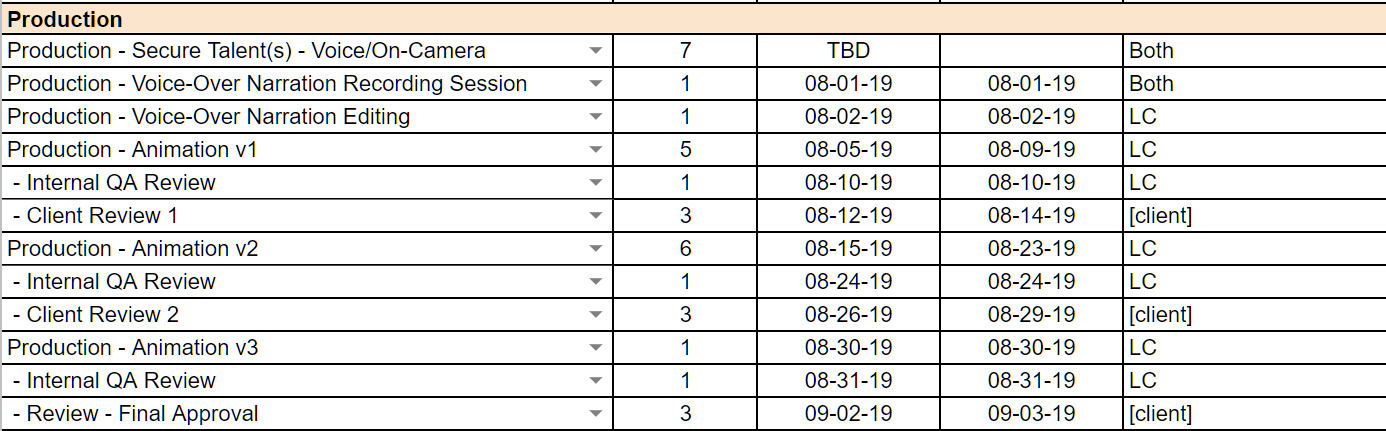
Establish who will review the video at each stage of the process. I recommend at least two revision cycles before you share it with your learning audience. Below is a segment of my project timeline doc that shows everyone what to expect on a learning video project.

Review your storyboard/script notes
If you worked with a team to make the video or if you made it by yourself, there should be field notes. These are notations made on the script or storyboard during filming. As a producer, I like to mark the timecode of the good takes so it’s easier to find them when editing while also ignoring the not-so-good ones.

Have your style tile or guide on hand
Refer to your brand guidelines and/or style tile while you build your video. I love a good style tile because it provides everyone with a one to two-page document that defines how everything should look. Here’s an example that demonstrates guidance on typography, logos, colors, texture, iconography, and animation style.


Choose your software
I use and recommend Adobe Premiere. However, if you would prefer to use Screencast-o-matic, Camtasia, DaVinci Resolve, or Final Cut it’s up to you. If the names in the previous sentence read like lorem ipsum, I suggest checking out my guide on the Computer Gear You Need to Make Learning Videos. Whatever tool you choose, remember that it is a tool. It should be easy for you to use to accomplish the purpose of your learning videos while providing you the level of professionalism that is good enough for your audience.
Helpful Links
Critical Thinking and Planning Your Video’s Editing Style
Edit Suite: Plan for Better Editing

EDITING
If you want to become a KSB master, you need several processes. How to Edit Learning Video is super important if you are making your own videos. Editing video is a linear process. Begin with folder organization and end with the way it looks. Follow the ten steps below and you will own that KSB promise. You will help your learners improve their knowledge, skills, and behaviors.

Make folders
Create a main folder for your project on your computer. Then, create subfolders within that main folder where you’ll store (and easily find) everything you’ll need for editing. Check out the screencap for an idea of the set up I use. There should be a subfolder called Assets where you’ll have sub-sub folders for your video clips, audio files, photos, and graphics. Your next subfolder will be for Documents, where you’ll keep your scripts, shot lists, and storyboards in their own sub-subfolders. Then, create a subfolder for Exports, where you’ll store your final edited files. Finally, the last subfolder you need to create is for your Project Files – these are the files that get created by your editing software.


Organize
Now that you have your folder structure, start putting stuff in it! Organize your “assets” into the folders you created. To repeat, an “asset” is any kind of media you will use in your video: audio narration, video clips (both a-roll and b-roll), images, icons, music, and sound effects.

Make a selects sequence
Now that you’re organized, you can start reviewing your video footage for the best takes. When you locate a good clip that you’ll want to use, drag it onto a track on your video editor’s timeline to create a “selects sequence.” Don’t worry too much about getting everything in perfect order yet – this is just to make sure you have your best clips at hand while as you master how to edit learning video.

Create a rough cut
Look at your storyboard or script and assemble the video in the sequence that the writer intended. Use the best of the best clips from your selects sequence to string together your “rough” (aka first draft) version of the final video. Avoid music, titles, graphics, and photos at this point. When you put those in too early, they can be a pain to tweak/fix if and when you need to make major edits to your rough cut.

Trim the rough
Watch your rough cut several times. Try to cut down on the wasted time where there’s no action or the actor is not talking. The trimming process is often what people think of as editing. You will be trimming the clips so that only the parts needed for the final story are left on the timeline.

Use b-roll to cover your story
Once your rough cut is solidified, add b-roll or other video that does not feature the actor(s) talking. Use shots of the scene or actions to cover the cuts, doing this will help things flow and add visual interest. For example, it’s common to cut from someone talking to show a close-up of their hands. You may also use b-roll of a prop to highlight the story if the actor references that prop during their dialogue.

Add graphics, music, and sound effects
It’s time to add the sprinkles to your video sundae. Add the titles, graphics, icons, music, and sound effects. Unlike my own use of sprinkles on my favorite ice cream, use each of these sparingly. Avoid putting music under the teaching portions of the video. Reserve music for your intro/outro sections or when you are changing scenes.

Add transitions
Transitions are subtle animations that help visually tie separate video clips together. There are many different types built into your editing software, but I recommend keeping your transitions fairly basic: cut, dissolve, or a wipe. The most common is a cut, and just by trimming and placing clips in a sequence, you’ve already inserted those in your video at this point. Look for places where a dissolve or a wipe may help the viewer engage from one scene to the next.

Normalize the audio
Now that the visuals are locked into place, you want to normalize the audio. This simply means getting all of the clips to a similar volume from the beginning to the end of the video. Sudden volume changes can distract viewers. The overall mix should span from –6db to -20db. Dialogue sounds good at –6db to -12db. Music should be at the-14db to -20db level and sound effects should stay between-15db to -24db with occasional spikes up to -7db.

Color correct
Correcting the color in your video at the most basic level means making sure that pure white is the same from one scene to the next. If not, this can also distract your viewer and “take them out” of the world of your video. Here are some tutes to help you with this step:
How to Color Correct Video (The 101 Guide!) – YouTube
How To Color Correct Videos FAST! (All Major Editing Software)
What’s next? Once you have completed these 10 steps you’ll know better how to edit learning video like a pro. Now it’s time to export or share a version of your video with your learners.
Helpful Links
Video Editing Workflow: How to Do it Properly
The Ultimate Checklist for Video Editing Basics
4 Tips to Improve Your Video Editing Workflow

SHARE
Congratulations! You did it! You edited the world’s best learning video. Okay! Maybe you don’t like the author of this blog post acting like Buddy, but my point is you have done the hard work already. Making a video that is ready to share takes a lot of patience and skill. Sharing a video is a step by step process that you need to internalize. These five things will cement your KSB promise. You will help your learners improve their knowledge, skills, and behaviors.

Obtain sign-off
The review cycle is essential in all learning projects. If you or your project manager has kept reviews to two consolidated sessions, then you won’t need this final review step. However, I suggest that you obtain final sign-off from all leaders on the project. You want a final round of feedback to guarantee that the video is great before step 2. If you are DIY-ing it, make sure you’re getting a second set of eyes and/or taking a good, long look at your video to ensure that it fits your content and quality standards.

Create subtitles
This needs to be done for every learning video you make. I think it is just as important as good audio. “Really?” you may exclaim. “Yes!” I say! Outside of the learning video world, most people watch videos without sound. If you can believe it, over 80% of people on social media watch video without sound. In the learning video world, we need to account for that viewing behavior.
FYI: Subtitles are a translated version of a video’s transcription, meant to give the viewer a real-time experience of what is happening on screen (Science of Subtitles).
Dann Albright further supports my assertion in his 7 Reasons Your Videos Need Subtitles infographic. Basically, he states that placing subtitles on your learning video increases engagement by 25% while also leading to better comprehension.
Read more about why subtitles are so important in the helpful links at the bottom of this post.

Verify the format
If terms like codec, compression, h.264, and bit rate make you want to scream before you start Googling, please take a breath. Your final delivery method is going to dictate these details. Chances are, your authoring tool has a preferred format for videos, so you should use that.. I’ll make it simple. For example, Articulate Rise “recommend(s) using high-quality videos with a 16:9 aspect ratio for the best results in your published courses. Rise 360 compresses videos so they have smaller file sizes while maintaining quality, converting videos to H.264 video and AAC audio in MP4 containers.” My personal experience suggests that if you provide Rise with an h.264 AAC video the compression will not degrade the video quality.
Save and export your video at the highest quality available to you.
If you are like me and crave the details, here is a list of export format parameters that pros use.
Format: h.264
Preset: If you have this option choose Vimeo or YouTube.
Size: 1920×1080 – unless your source video is smaller. Never enlarge your video from its original size.
Frame rate: The higher the frame rate the smoother the image will be. But, like the size, you cannot enlarge the frame rate without degrading the quality.
Audio: 320 Kbps is ideal, with a 48kHz sample rate. If you have to step down, please listen to it to make sure the audio loss is marginal.

Export for the deliverable
If your learning video is going to be imported into an authoring tool like Storyline or Rise, then a high-quality MP4 will be ideal. If you are going to place it directly into your LMS, then please do a Google search with these keywords: “name of LMS” + video formats. Most will take an MP4.
If your deliverables will live on social media, please refer to the guidelines below:
YouTube Upload Encoding Settings
Everything You Need to Know About LinkedIn Video

Start the update clock
Once you publish a learning video you are on the clock. Even if you tried to plan and produce evergreen content, eventually you will need to update the video. If you or your management team has planned appropriately, it will be time to start the measurement and maintenance phase of the learning plan. In other words, deploying your video for learning is not the end of the instructional design process. You need to have reminders built into a calendar to check-in on your video’s success. Typically, this is built into the overall training strategy. However, it is critical that you plan for the eventual update by cleaning up your folders and archiving any old drafts. And make sure everything is triple backed-up!
Helpful Links
Video Editing Workflow: How to Do it Properly
The Ultimate Checklist for Video Editing Basics
4 Tips to Improve Your Video Editing Workflow
Subtitle Support
Lights, camera, caption! Why subtitles are no longer just for the hard of hearing
The Science of Subtitles: How Subtitles Actually Work
7 Reasons Your Videos Need Subtitles [Infographic]
Subtitles are more important than you think
Summary
Video editing can be overwhelming and frustrating if you do not take the time to organize…and stay organized. As you master how to edit learning video, you will find ways to improve your workflow using new skills. Staying consistent in your process helps you produce high-quality deliverables for your learners. It’s important to take the editing process one step at a time, as each part of the process builds on the ones that come before. Before you know it, you’ll have an amazing learning video delivering on that KSB!
Join my learning pals
How do you stay organized during your editing sessions? Share your voice with me.
Join my learning pals. Please subscribe to my newsletter to receive free learning resources delivered to your inbox every two weeks.
THE END