A common problem in video production is overlooking the DISTRIBUTION process. This post gives you step-by-step annotated process to help you distribute your video like a professional. Check out the read-do checklist below to make sure you plan a successful launch of your video. I mean damn! You have worked very hard to make a video, now it’s time to make sure distribution yields success.
Checklists save you time because you don’t need to use time remembering the steps, therefore you can dedicate all your time on doing the task. Checklists also allow you to delegate tasks confidently and effectively. Using a checklist is an excellent way to make our lives simpler and our businesses more productive.
~ Sandra Melo How to use checklists to improve efficiency?
I’m on a mission to help you make video for learning purposes. In order to understand how to distribute learning video you need similar skills and tools that marketers and filmmakers use, but there is a key difference: #KSB. When distributing a learning video you must deliver on the promise of improving knowledge, skills, and behaviors always at the forefront of the process. This checklist guide will help you become a better professional video creator.
CAUTION: Wait, what? If you haven’t analyzed the need, written the script, planned out the production, set up and recorded all of your footage, then stop reading this checklist and refer to the helpful posts below:
A Training Needs Analysis Guide
Ultimate Guide to Scriptwriting
Video Pre-production for eLearning: The Ultimate Guide
How to Set Up and Record Learning Videos in 6 Steps
How to Record Professional Learning videos: The Ultimate Checklist
How to Edit Learning Video: The Ultimate Checklist
How to Distribute Your Learning Video: The Checklist
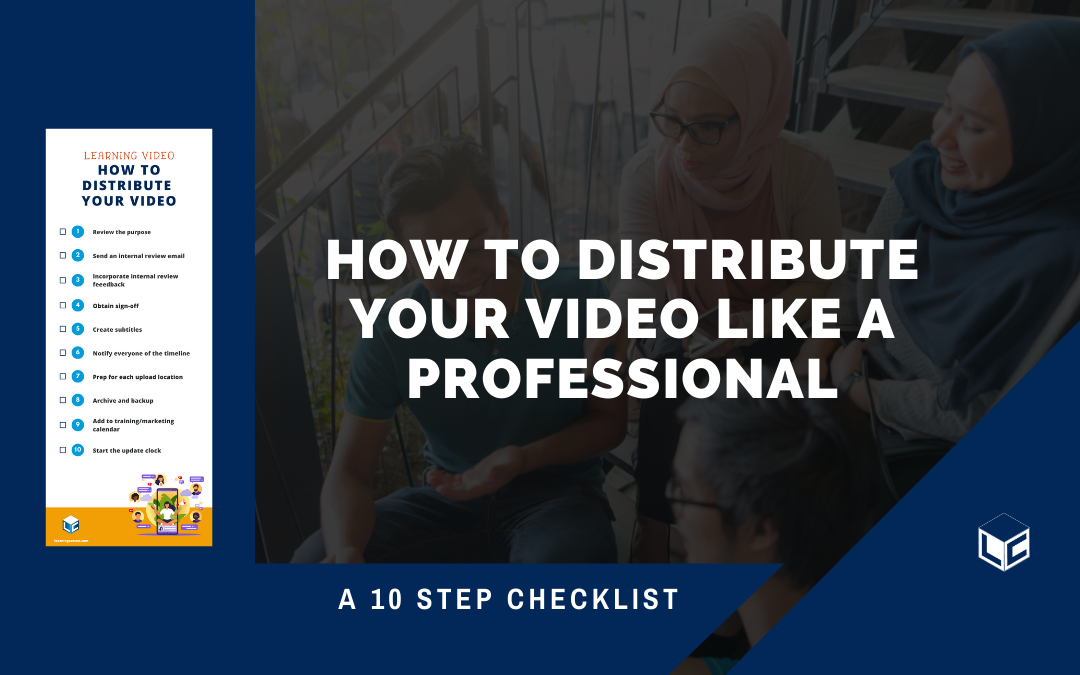
How to Distribute your Video Like a Professional in 10 Steps

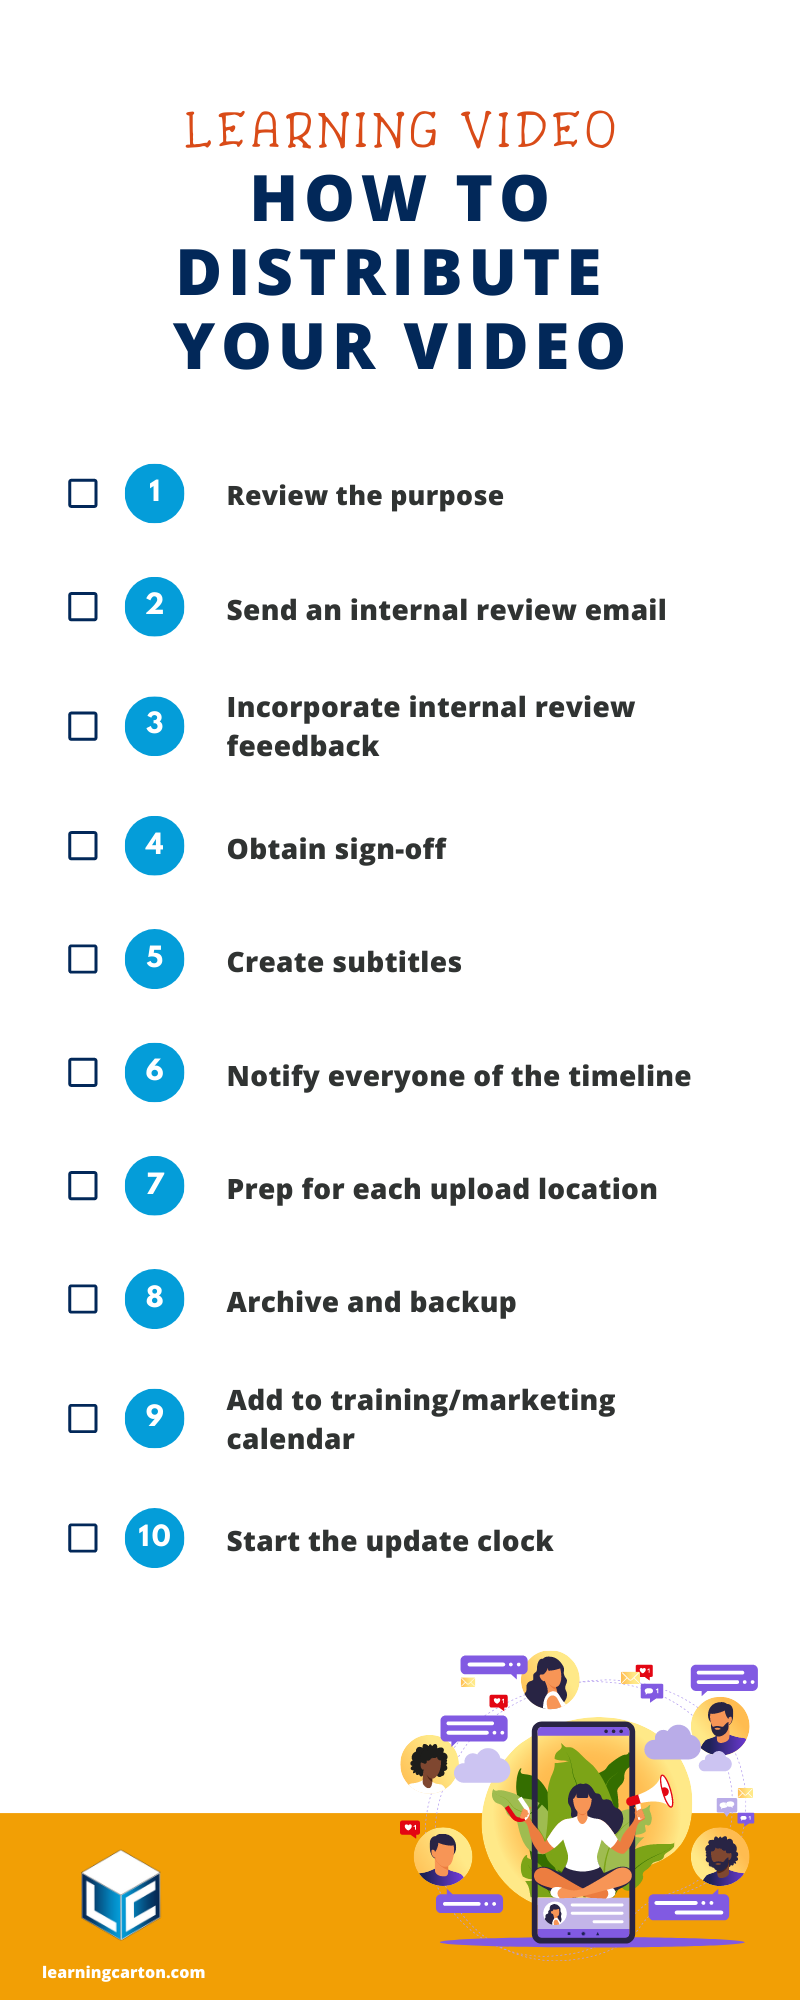
Review the purpose
Before you send your video for review, confirm that it delivers what you planned on delivering. Refer to your learning/marketing strategy or business purpose plan and ask yourself: Are you raising awareness? Teaching a skill? Demonstrating a process? Keep this in mind so that you are prepared to discuss this with any stakeholder, reviewer, or commenter that may question your intentions. If you overlook your purpose, you run the risk of sharing a sequence with flashy graphics that does not accomplish the purpose of the video.

Send the internal review email
You have established who will review the video at each stage of the process. You’ve planned one or two revision cycles. Now, it’s time to communicate the progress. Write and send the email that asks for feedback. I suggest it look something like this:
Hello [insert name(s)],
[intro section] The time has finally arrived. Here is the first draft of my video, [insert title of video]. I’m seeking your feedback. Please click the link [insert link to your video review page] and enter the password [insert password].
The link will take you to a review page where you can offer direct feedback by clicking on the video itself. Please share with your team to get feedback. Here’s a short video that explains how to use the Review tool.
Please try to make sure that all feedback is actionable and consolidated so that it is crystal clear on how we can make this video exactly as you would like to see it completed.
I’ll look for your feedback by [insert date you need your feedback]. Thank you!
Sincerely,
[your name]
Note the bracketed and boldfaced portions of the email example are important for you to pay close attention to in the email communication. Create a short hook intro sentence to get people energized to review the video. For example, I’m so happy to share the result of our massive effort to make a video that teaches people how to make a cheese sandwich. Be sure to name the video by title and link to it in the email. Make the link private and/or password protected. Ask for consolidated feedback to avoid people arguing over what needs to be changed in the comments section. ABOVE ALL, set a date you need the feedback returned. Establish a deadline and make people accountable to that time.

Incorporate internal review feedback
When you receive feedback by the deadline you established in your email, you need to update the video edit. Of course, some things may not be easy to change and may require conversation to resolve, but the key part of this stage of distribution is making your stakeholders or reviewers feel like their opinion matters.

Obtain sign-off
The review cycle is essential in all learning projects. If you or your project manager has kept reviews to two consolidated sessions, then you won’t need this final review step. However, I suggest that you obtain final sign-off from all leaders on the project. You want a final round of feedback to guarantee that the video is great before step 2. If you are DIY-ing it, make sure you’re getting a second set of eyes and/or taking a good, long look at your video to ensure that it fits your content and quality standards.

Create subtitles
This needs to be done for every learning video you make. I think it is just as important as good audio. “Really?” you may exclaim. “Yes!” I say! Outside of the learning video world, most people watch videos without sound. If you can believe it, over 80% of people on social media watch video without sound. In the learning video world, we need to account for that viewing behavior.
FYI: Subtitles are a translated version of a video’s transcription, meant to give the viewer a real-time experience of what is happening on screen (Science of Subtitles).
Dann Albright further supports my assertion in his 7 Reasons Your Videos Need Subtitles infographic. Basically, he states that placing subtitles on your learning video increases engagement by 25% while also leading to better comprehension.
Read more about why subtitles are so important in the helpful links at the bottom of this post.

Notify everyone of the timeline
Now that you have an approved and subtitled video, send a follow-up email that thanks everyone for their input and notifies everyone of what’s coming next. If you recall, a solid process includes you sending a timeline during the kick-off meeting and subsequent meetings that refer to the “Production Timeline” as seen below.
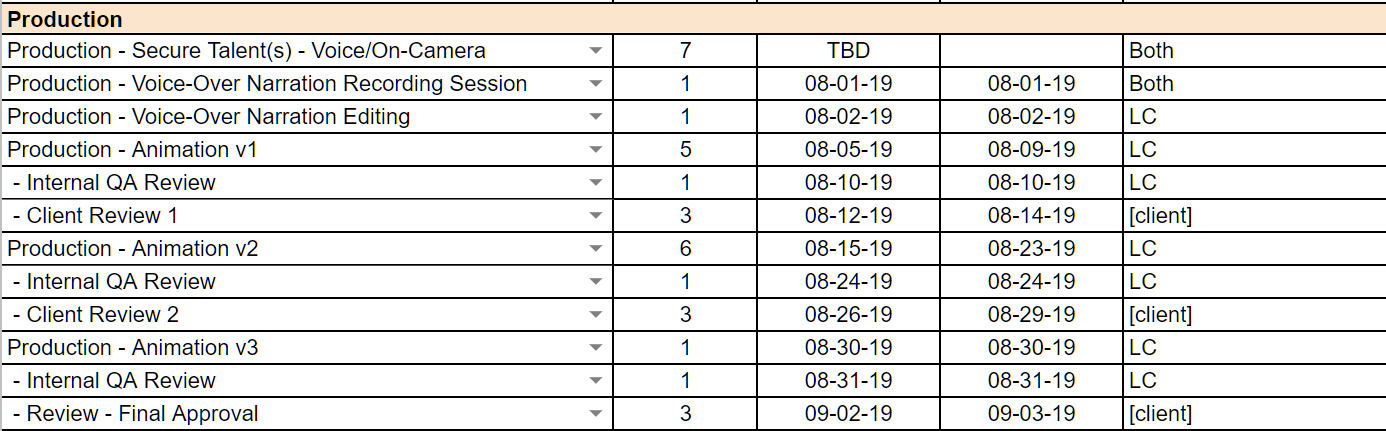
Now, it’s time to thank and notify. Send them an update that includes the “Implementation Timeline.”

Send an email that looks something like this:
Hello [insert name(s)],
Thank you for taking the time to help [insert name of learning audience] learn how to [subject of the video]. Your valued input has helped us to deliver on [business purpose for the video].
So you are in the loop, I’ve included the next steps timeline for the video. If you have any questions or concerns, please reach out!
Once again, thank you for your input and commitment to the learning and development of our [name of learning audience].
Sincerely,
[your name]


Prep for each upload location
If terms like codec, compression, h.264, and bit rate make you want to scream before you start Googling, please take a breath. Your final delivery method is going to dictate these details. Chances are, your authoring tool has a preferred format for videos, so you should use that. I’ll make it simple. For example, Articulate Rise “recommend(s) using high-quality videos with a 16:9 aspect ratio for the best results in your published courses. Rise 360 compresses videos so they have smaller file sizes while maintaining quality, converting videos to H.264 video and AAC audio in MP4 containers.” My personal experience suggests that if you provide Rise with an h.264 AAC video the compression will not degrade the video quality.
Save and export your video at the highest quality available to you.
If you are like me and crave the details, here is a list of export format parameters that pros use.
Format: h.264
Preset: If you have this option choose Vimeo or YouTube.
Size: 1920×1080 – unless your source video is smaller. Never enlarge your video from its original size.
Frame rate: The higher the frame rate the smoother the image will be. But, like the size, you cannot enlarge the frame rate without degrading the quality.
Audio: 320 Kbps is ideal, with a 48kHz sample rate. If you have to step down, please listen to it to make sure the audio loss is marginal.
If your learning video is going to be imported into an authoring tool like Storyline or Rise, then a high-quality MP4 will be ideal. If you are going to place it directly into your LMS, then please do a Google search with these keywords: “name of LMS” + video formats. Most will take an MP4.
If your deliverables will live on social media, please refer to the guidelines below:
YouTube Upload Encoding Settings
Everything You Need to Know About LinkedIn Video

Archive and Backup
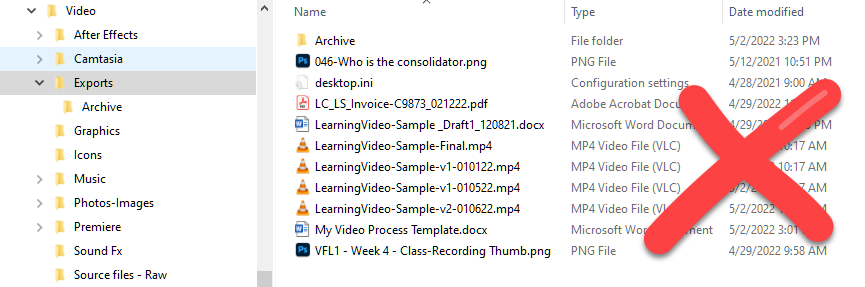
Now that you have completed your video and it’s ready to publish exactly as the location dictates. It’s time to clean up your internal folders on your local and cloud drives. When I edit any video project I start with a folder structure. It’s the same folder structure for every project. The uniformity makes it easy to find what you need later, like much later (think 1-3 years from now).
After you have shared the video, return to the Exports folder and move files into the proper archive folder. Drag all of your old versions into the archive folder. Here is what a folder may look like when a project is being distributed. Notice how there are multiple versions of the video file in the exports folder. There are even file types that don’t even belong here. Clean them up.
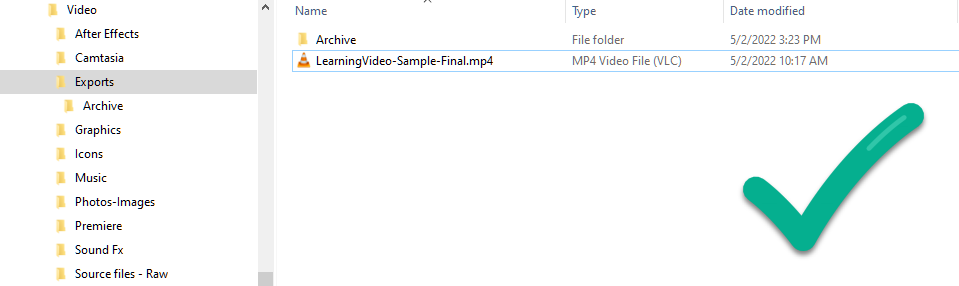
Here is what a properly archived Exports folder should look like. One week or one year from now, when you return to the Exports folder to find your video file, it will be the only one in here.
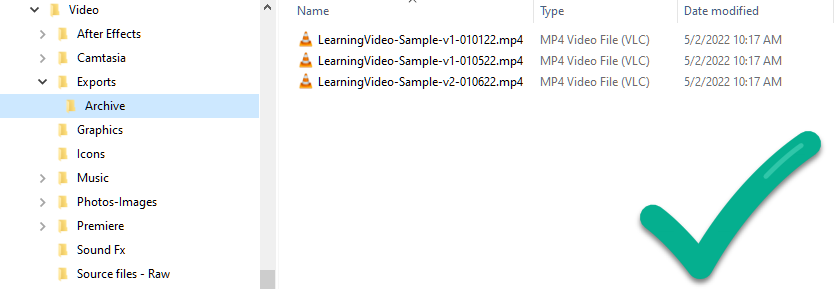
Now take a peek inside the Archive folder. Notice how only video files are located inside. I’ve moved the word documents and image files to the proper locations.
From now on, when you return to the folder you will easily be able to locate the export you need to update. I suggest doing this with every project file: sequences from your editing software, scripts, PowerPoints, and graphics.
Once everything is archived properly, backup your final video file. Here is where I refer back to the 3-2-1 backup rule.
This rule means that you should:
3 – create a primary backup and two copies of your file
2 – save your backups in two types of media (cloud & local drive)
1 – keep one backup offsite
Learn more about the origin and background of the 3-2-1 rule.
Be sure to backup all of your files.
It’s not a matter of “IF” your computer will fail, but “WHEN”!
Mr. Karel, Computer Lab Teacher who consoled tens of students over the loss of their files.

Add to the training/marketing calendar
A training calendar is like a blueprint for your other tools. In other words, if you plan ahead where everything will fit in a week or month, then the tools become instruments of continuous improvement.
A solid training calendar clearly delineates when training takes place and where learning is built into the calendar.
In addition, the key difference between training and learning is that training is something led by someone or consumed on-demand in a set time period, whereas learning takes place all year round. Learning can be in-person, on-demand courses, and social interactions.
The training calendar includes:
- Training programs
- Delivery methods
- Dates when training are held
- On-demand schedule
- Trainer assignments
- Dates when training will be reviewed for maintenance
As you work the training calendar, you’ll feel prepared to answer questions and respond to new training needs. The training calendar will help you manage the entire process of training including on-demand learning.
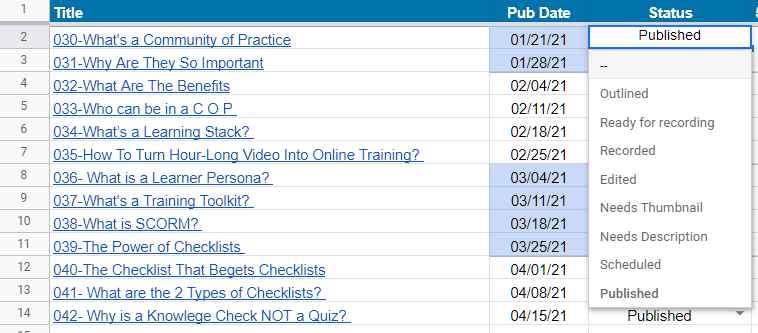
A marketing calendar is similar to the training counterpart in that it also lays out the distribution timeline for all of your content. Since I currently handle marketing on my own, I maintain a simplified content calendar in a spreadsheet. As you can see below, I track the title, publish date, and I have a drop down menu to list the status of completion. This way I can interact with freelancers or members of my team right in the document.
When you are ready to distribute your video (publish), make sure to document the date it goes live in your calendar. This will be helpful when you come back to look for topics you’ve covered and to aid you in finding content to repurpose for other learning initiatives.

Start the update clock
Once you publish a learning video you are on the clock. Even if you tried to plan and produce evergreen content, eventually you will need to update the video. If you or your management team has planned appropriately, it will be time to start the measurement and maintenance phase of the learning plan. In other words, deploying your video for learning is not the end of the instructional design process. You need to have reminders built into a calendar to check-in on your video’s success. Typically, this is built into the overall training strategy. However, it is critical that you plan for the eventual update by cleaning up your folders and archiving any old drafts. And make sure everything is triple backed-up!
A video is like dried basil. When you first get it, the flavor is amazing. Three years later, that basil could be as bland as oatmeal. A video (especially a live video) ages quickly. The content may stay relevant for a year, but don’t assume people will want to watch it after a year. Three years later, I’m guessing no one is watching that pre-recorded live video–at least not by choice.
Here’s a simple video obsolescence plan:
- Set a date to review the video (usually 1 – 3 years after sharing)
- Create a reminder in your training calendar to review engagement data
Answer the following questions:
- Is the topic of the video trendy or specific to a time of year?
- If yes, then make a note when it may need updating for that time period.
- If no, consider it good for a year minimum.
- Is the video made up of sections?
- If yes, make a plan to edit the video into smaller chunks for microlearning.
- If no, consider it good for a year minimum.
- Do new hires need the content?
- If yes, review it every year to improve the instruction.
- If no, consider it good for a year minimum.
- Is the video only relevant to a small group of people?
- If yes, consider it good to share for less than a year.
- If no, review it every year to improve the instruction.
Helpful Links
Video Editing Workflow: How to Do it Properly
The Ultimate Checklist for Video Editing Basics
4 Tips to Improve Your Video Editing Workflow
Subtitle Support
Lights, camera, caption! Why subtitles are no longer just for the hard of hearing
The Science of Subtitles: How Subtitles Actually Work
7 Reasons Your Videos Need Subtitles [Infographic]
Subtitles are more important than you think
Summary
Video distribution is often overlooked. Using a checklist is an excellent way to make your life simpler and your business more productive. This checklist guide will help you become a better professional video creator. As you master how to plan, make, and edit learning videos, you will find ways to improve your workflow using new skills. Staying consistent in your process helps you produce high-quality deliverables for your learners. It’s important to focus on the distribution process so that you set yourself up to succeed today and in three years.