“Process is how we organize the complex so that we can replicate it!”
I’m on a mission to help people make and use video for learning purposes. This installment focuses on a model for helping people create learning videos. We need five phases of video production for learning. This is part three of Video for Learning Fundamentals. If you missed the first two parts, please feel free to check out Part 1: The Case for Video and Part 2: We Need Learning Video Production Skills.
So let’s get to it!
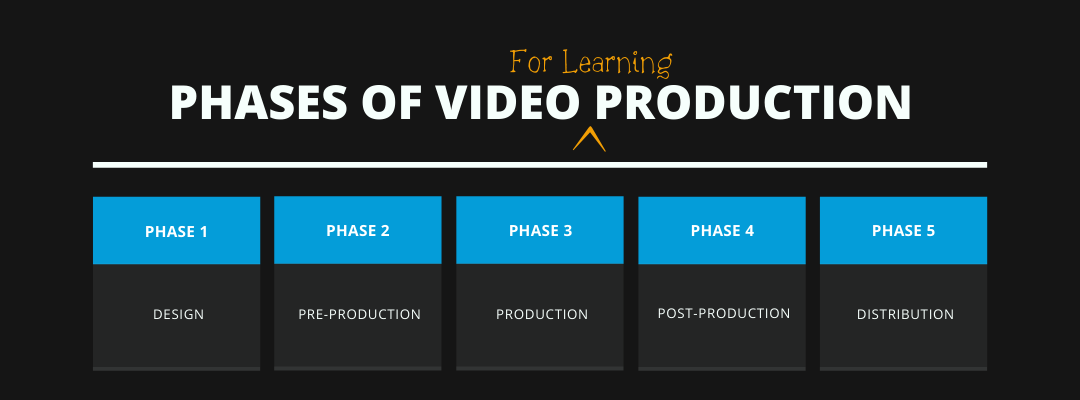
5 Phases of Video Production for Learning
The traditional phases of video production need to change if we are to make videos for learning purposes. Design, or more specifically instructional design, needs to be incorporated into the first phase! By borrowing from the five stages of the commonly used instructional design process, ADDIE, we can merge the two models for efficiency. The phases of video production for learning will improve your learning videos. As I’ve argued, we need to avoid making informal or home videos and passing them off as learning videos. Instead, we need to raise our collective consciousness of professional video production as if it were a new model of learning or a new form of communication.

Once internalized and mastered, the use of the five phases will help you to distinguish entertainment from learning. Your new understanding of the five phases will also help you learn where video fits within an eLearning course creation process.
Anyone with a smartphone can make a video right now, but it doesn’t mean they should – especially for professional learning projects. We can avoid making “home video” by using the five phases of video production for learning. As you read through the phases below, remember the key differentiator between video designed to train or teach and video designed to market or entertain.
The purpose of video for learning is to improve knowledge, skills, and behaviors.
1. Design
The first phase of video production for learning is design. Designing video for learning really begins during the “analysis” phase of ADDIE (the first A). This part of the process includes conducting a needs analysis, which helps you figure out what your audience actually needs to learn. Does the staff need a refresher on how to interact with difficult customers, or do they really just need a refresher on using the point-of-sale system? It’s about finding the knowledge gaps that might be hiding behind the problems standing in the way of your business goals.
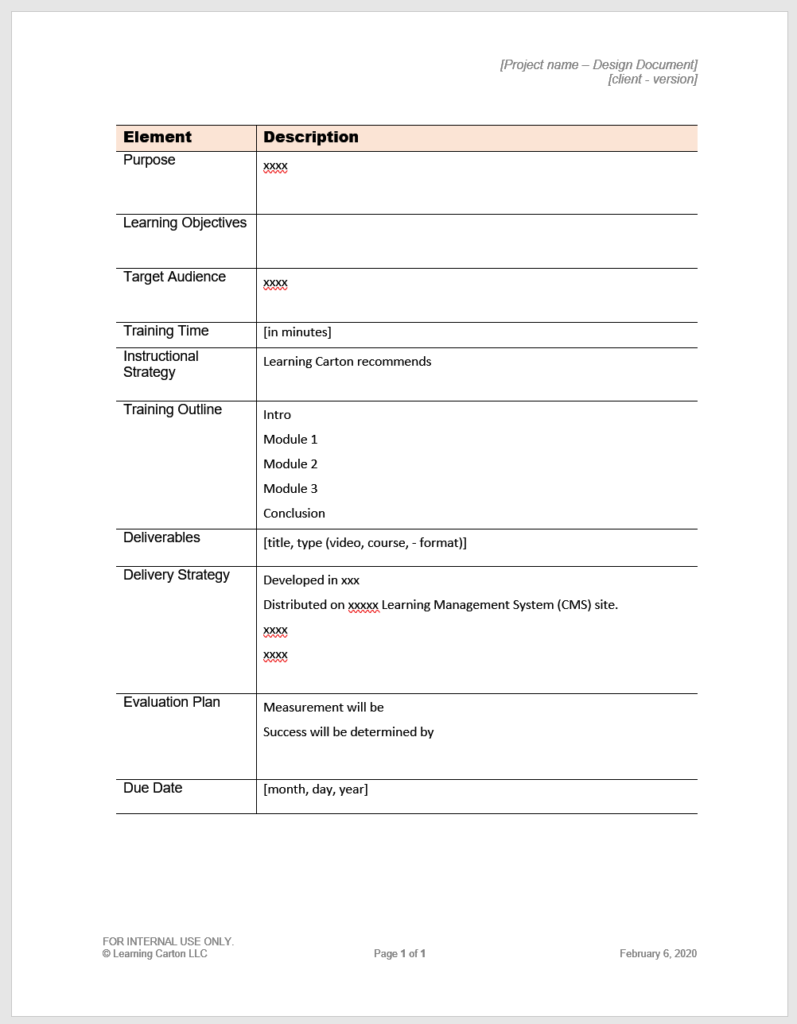
Once you know what you’re trying to teach, and you’ve confirmed that video is the right teaching method, it’s time to start planning! You’ll want to take the results of your needs analysis and start working on a design document for the video called a creative brief.

A Creative Brief Improves Design
A creative brief is similar to an instructional design document or course outline, which is an organized way of showing all of your plans – think of it as a handy blueprint that lays out all of the components of your training. It’s written before an instructional storyboard is created. A creative brief summarizes the video project’s business purpose and explains how the video will address that need. I use the design document to inform my creative briefs especially with clients who are new to video. For simplicity, I merge the creative brief with the design document. If you have been successful in merging the two documents, I’d love to see your document design. Teach me!
The creative brief should answer these ten questions about the video project:
- What is our business problem and how will the video solve it?
- Who is our target audience?
- What is our message?
- Why should our audience care?
- What should our audience be able to do after watching the video?
- What type of video will we use?
- How will the video be used in the larger learning course or training?
- What is our budget?
- Who needs to be involved?
- When will the video be completed?
Now that you’ve got the design down, it’s time to start pre-production!
2. Pre-Production
Pre-production is a sophisticated way to refer to any task you complete before you press “record.” Everything you do in pre-production will be tied in some way to supporting the creative brief you wrote during the previous phase. This includes scriptwriting, visual storyboarding, and preparing a production schedule (also known as a call sheet). The more you can plan out ahead of time, the better. You’ll want to audition and select talent, hire a crew, secure all of the necessary equipment, scout locations, and review all of these plans with your client.
Shooting a simple video may seem, well, simple at first. I’d argue that if you don’t fret over the details, then internalized the phases of production is super important for you. Professional, high-quality productions take careful planning. They don’t just happen. I used a checklist when I got started. My checklist became my roadmap to keep track of the details that affect the style, tone, and quality of the learning video. Even something as basic as the color of your spokesperson’s shirt could throw everything off (wearing green while shooting green screen work, for example – hello, floating head!).
3. Production
All of the work that results in the physical creation of project assets is production. Most learning videos involve recording live-action, audio narration, and/or creating illustrations and animations. Live-action recordings result in files such as MOV or MP4. Typically, the camera’s built-in microphone, or even better, a separate microphone fed to the camera or audio recorder will capture the audio and combine it with the video data. Recording the narrator or voiceover generates audio-only files such as WAV, AIFF or MP3.
Audio can be gathered in a studio using a microphone routed through a mixer into a computer. Studio recordings provide you the most control and should be used if the budget allows. Audio can also be recorded on location using a microphone connected to a field recorder.
Creating images and animations requires a photographer, illustrator, and/or animator, and software, to produce the visual imagery.
So, do you have your script finalized along with everything and everyone you need? Great. Now it’s time for production! If you aren’t quite sure, no worries. I have a delicious hunk of content dedicated to pre-production with a handy dandy checklist that will help you answer confidently in no time. You’ll be able to say: I’m so ready to make this video! Let’s do this! I got this! Yeah!
4. Post-production
Post-production is assembling the recorded assets (audio, video, images, animations) into a viable training video. During this phase, an editor places the files into a sequence that makes sense logically. By adding transitions and text, the editor turns the assets into a video that will improve knowledge, skills, and/or behavior. The final sequence should match all of the plans you made during the design and pre-production phases (or come pretty close).
Now that you have your completed video, what do you do with it? Get it in front of your learning audience, of course – also known as distribution.
5. Distribution
Video for learning purposes is distributed in three ways: direct (such as on a company’s internal website or a platform like YouTube or Vimeo), inside of an eLearning course, or through a management system (CMS or LMS).
Direct distribution is challenging to track in terms of monitoring training completion and effectiveness without a strong understanding of internet analytics. Views and likes may be easy to count, but these are vanity metrics, which are hard to tie to learning objectives. In other words, they’re not very helpful in evaluating learning videos. If the learning objectives are not a part of how you measure the success of your learning video, then you are essentially making video for marketing purposes.
Most common distribution method
Adding video to an eLearning course is the most common type of learning video distribution. Using video in a course is the best way to utilize video’s fundamental connections to learning. It’s providing the right content at the right time, which is crucial to training success. Effectiveness is easy to evaluate when the video is inside of a Learning Management System. For example, you can track the amount of time someone spends watching a video or if the learner scores well on assessments designed to measure comprehension of the video content.
LMS distribution is as straightforward as it sounds. With this method, you upload the video to a designated location within your organization’s LMS and then link it to your employees’ existing learning plan. Some people call the video a “learning object” as it stands alone. Depending on the LMS features, you can track and assess the video too.
Pro-Ref: According to Chris Pappas, the top five LMS platforms of 2019 are Adobe Captivate Prime, Docebo, SAP Litmos, LearnUpon, and Asentia.
I have found great value in Talent LMS for small to medium-sized businesses.
If you are an info nerd like me, you may want to see how production companies talk about the phases of production. Here are two well-written posts about video production for marketing, advertising, and entertainment.
Summary
With careful thought, design, and planning, your video for learning production will deliver on the promise of learning video. As creators of learning video content, we should always keep the promise of learning video squarely in focus: engage the learner to improve knowledge, skills, and/or behaviors. By adopting the five phases of video production for learning, you will make better productions for your learning audience.
Join my feedback loop
What do you think of my five phases for learning video production?
If you liked what you read, and would like to join the conversation, please consider subscribing to my newsletter to receive free learning resources delivered to your inbox every two weeks. I love feedback loops. As Elon Musk said, “I think it’s very important to have a feedback loop, where you’re constantly thinking about what you’ve done and how you could be doing it better.”
THE END


