As you learn to edit video, you’ll find there are skills that elevate you to professional status. This post offers you those skills! I’m on a mission to help people make and use video for learning purposes.
So let’s get to it!
A good edit is one that no one realizes is there.
~ Chris Karel
10 Best Ways to Edit Video like a Professional
Your objective in all learning video edits is to improve the #KSB (Knowledge-Skills-Behaviors) of your audience. Whether they are nine or ninety, classroom students or boardroom executives, your objective is the same. Create an edit that helps your viewer learn something, practice something, or even better interact with something! The edit should be clean and intentional, keeping the focus on the learning.
Keep it simple
A simple edit is easy to follow. By simple, I mean only use what footage and other visuals are necessary to tell the story, teach the knowledge, or demonstrate the skills. Avoid using flashy effects and graphics – they will distract from the message. Simple text titling with subtle movement will help keep interest without breaking the illusion of realism.
Set in and out
When you are trimming video clips you need to master the use of IN and OUT. In the clip below, you can see that the editor selected the part of the video clip that occurs between the two blue lines on the timeline. By marking the in and out, you can reduce your overall editing time while reducing the amount of video footage you will show your learner. This skill helps you shape scenes of raw footage into a finished, coherent piece. Learn how to master the in and out points while you are making a selects reel (see below).

Log and select
After you load all of your footage into three redundant backup locations, you are ready to “log” your footage. This means you need to review all of the clips and sort them into folders (bins). As you review your raw footage, set in and out points on clips that you “select” as potential keepers for your final edit. I even go so far as to make a quick cut of the best clips in a sequence as the script suggests. This way when you make your final edit, you will have the best of the best at your fingertips, literally!
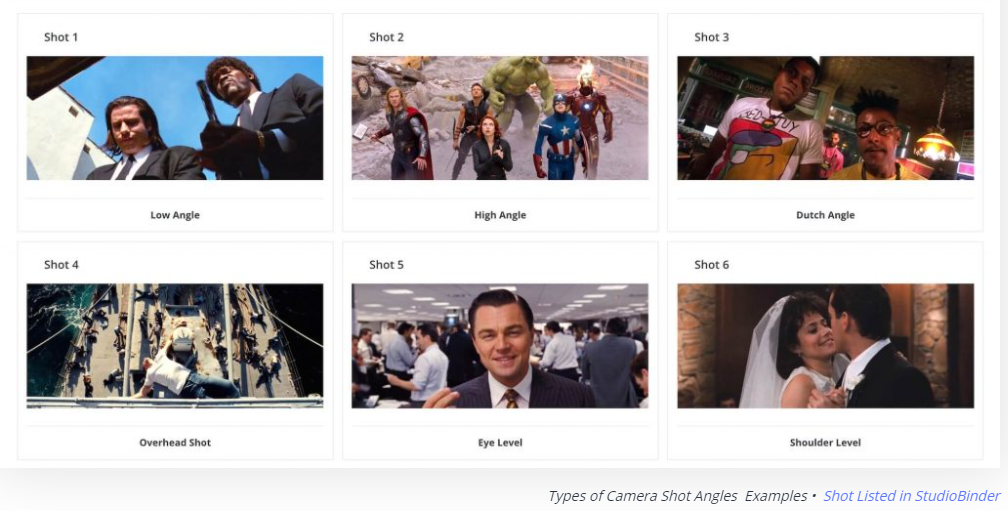
Use a variety of angles
If you didn’t play a role in recording the footage you are editing, this one can be tough to execute. However, if you are an editor and you are able to talk with the project manager or producer, then ask for lots of angles. As you edit, you can create interest in your subject and the story if you change the way the viewer sees the image. The next time you watch a video, notice how many different angles are being used – especially in scenes showing conversations. Certain angles have come to symbolize certain feelings, moods, or senses of space. For example, shooting from a low angle often makes the subject seem more powerful and/or imposing.
Understanding Camera Angles (video)
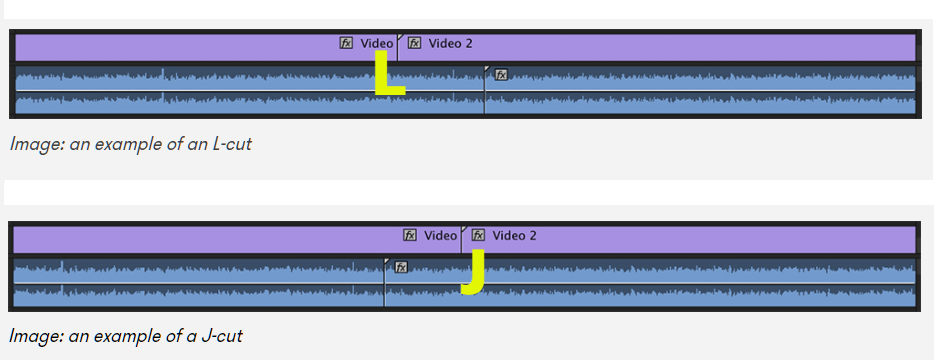
Use J and L cuts
One of the easiest ways to make your edits look professional is to use J and L cuts when you are making a sequence. Let’s look at what I mean by these two terms. An L cut goes to the video of the new clip while letting the audio of the clip continue. Whereas, the J cut allows the audio from the new clip to play under the video of the clip being cut. Click the link to Premium Beat’s post: What Are J-Cuts and L-Cuts? to see an example. These cuts allow the viewer to believe they are watching a single scene instead of multiple cameras from multiple angles. It works! And it’s used in everything you’ve ever watched!
Use overlays for emphasis
Everyone can recognize a lower third, which is the video term for the grouping of text that identifies the speaker on camera. Note how Neo’s real name is depicted in the “lower third” of the video image.

Overlays can also be used to draw attention to a subject or concept. For example, look at how the statistic is treated in the image below. The graphic overlay helps tell the story and provide emphasis.

Use minimal music
As I’ve said countless times if you are teaching something turn off the music. However, music can be a great way to transition between scenes or concepts. Music is also a wonderful way to grab attention in an introduction or compel action during an outro. Use music sparingly! It can distract from the message.
Learn how to color correct
One common issue with recording a number of clips over the course of a day or several days is the color. Remember, video will range from orange to blue. To color correct means, “to make sure that the colors of your footage are consistent in each scene” Adorama. Typically, this will mean you need to adjust the white balance and the brightness so that, at a minimum, it doesn’t look like you were turning a light on and off when you cut between your clips.
Get feedback before the final
A professional editing workflow should involve at least two rounds of revision. In our rapid development quest, I’ve seen clients and editors forced into one or, even worse, no revisions. This is unacceptable. Put up both hands to stop the madness or better yet run far away from that type of project. If you are truly making a KSB-improving video, then you need to follow the storyboard/script and seek the approval of all project managers. This requires using a review tool that allows you to gather scene-by-scene feedback. I suggest Vimeo review. This will allow you to share the video, get mark up or notes directly on the video, and then return a new version. Easy-peasy, lemon squeezy
Export
When you are finished editing, it’s time to export the video for your deliverable. Most video editing software will give you options to export (which means to save in a different format). If you are exporting for use in an authoring platform like Articulate Rise, or preparing to deliver on a CMS like Vimeo or YouTube, then use the guidance below:
We recommend using high-quality videos with a 16:9 aspect ratio for the best results in your published courses. Rise 360 compresses videos so they have smaller file sizes while maintaining quality, converting videos to H.264 video and AAC audio in MP4 containers. The maximum filesize for each video is 5 GB.
YouTube Recommended Upload Encoding Settings
Summary
If you want to edit video like a professional then you need to learn the terminology and then put it into practice. A simple learning video edit that is free from flashy effects is better than a fancy video that looks more like an advertisement. By setting in and out points while making a selects folder (or rough cut sequence!) you will speed up your ability to deliver a final edit. Choose a variety of camera angles as you use J and L cuts to create a seamless scene. Choose graphic overlays and use minimal amounts of music When used sparingly, both techniques will help improve KSB. Finally, you should color correct your video before you send it off for review. You want sign-off or approval on your final edit before you export. Be sure to export the video using settings that are compatible with your delivery format. You should be able to do an Internet search for the compression or encoding settings for your final destination. Be sure to send me a link to your video so I can see how awesome you’ve become as a learning video editor!
Helpful Links
10 Things You Need to Know About Editing Video
Video Editing 101 – The Basics
Join my learning pals
What professional video editing tip do you use the most? Share your voice with me.
Join my learning pals. Please subscribe to my newsletter to receive free learning resources delivered to your inbox every two weeks.
THE END